
A motion sensor is a tool used for detecting motion and alerting the presence of a moving object within a specific field of view. The device contains an electronic sensor that is triggered by motion, typically used to alert the presence of a moving object within a specific field of view. Motion detection enables the sensor to automate lighting by turning lights on or off based on detected movement, which increases energy efficiency and convenience. Motion sensors are often used for security applications, businesses, and homes where the users want to be alerted of any movement in a specific area. Motion detectors are typically small in size and detect movement by infrared waves; these waves are typically heat waves that radiate from moving objects such as people, cars, and animals. The movement then electronically triggers lighting fixtures to turn on for a set period of time, depending on your timer.
Key Takeaways
-
- Installing a motion sensor light switch enhances energy efficiency by automatically controlling lighting based on detected movement, helping reduce electricity bills and extend the lifespan of your fixtures.
- Safety is paramount during installation. Always turn off power at the electrical panel, correctly identify and connect wires, including the ground wire, neutral wire, and hot wire, and consult a qualified electrician if unsure.
- Proper selection, installation, and fine-tuning of your motion sensor switch’s settings, such as sensitivity and timer, ensure optimal performance, convenience, and security in your home or business.
Access Fixtures’ motion sensors provide automatic switching or dimming when used in combination with 1–10v dimmable LED drivers. Their compact size makes them suitable for use with most luminaires, and these motion sensors feature a built-in daylight sensor and a wide detection area up to 52 feet in diameter. The motion sensors used in Access Fixtures luminaires can be detected through glass, plastic, and thin, non-metal materials. These sensors allow for energy savings and can achieve three-step dimming, making them ideal for use in areas that require a notice of light change before fully switching off.
Additionally, each fixture with a sensor can be run in a series off the same line, with an exterior-based photocell. The photocell automatically adjusts its settings to the day/night cycle by detecting changing light levels, while the motion sensor reacts to any physical movement. Working together, photocells and motion sensors will control your exterior lights to deter intruders by creating the illusion of occupancy.
What Are Motion Sensors?
Motion sensors are innovative devices designed to detect movement and automatically control lighting, making them a perfect solution for modern homes and businesses. By installing a motion sensor light switch, you can ensure that lights are only on when needed, significantly reducing unnecessary energy usage. This not only helps lower electricity bills but also extends the lifespan of your lighting fixtures. The installation of a motion sensor switch typically involves working with your electrical panel, removing the existing light switch, and understanding the different wire colors involved. Following a step by step guide is essential to ensure a safe and effective installation. Whether you’re looking to enhance security, improve convenience, or save on energy costs, a motion sensor light switch offers a smart and efficient way to control your lighting with minimal effort.

Pre-Installation Steps
Ensure Safety by Turning Off Electricity
Before starting the installation process, it’s essential to ensure your safety by turning off the electricity to the existing light fixture or circuit. This step is crucial to prevent electrical accidents, electric shock, or fire. To do this, locate the main circuit breaker box and flip the breaker switch to the “off” position. Mark the breaker switch with tape to ensure it remains off during the installation process. Verify that the electricity is indeed off by using a voltage tester at the switch location.
Gather Necessary Tools and Equipment
To install a motion sensor light switch, you’ll need the following tools and equipment:
- Wire cutters or pliers
- Terminal screwdriver
- Knife
- Drill with large drill bits (if necessary)
- Voltage tester
- Motion sensor switch kit (including wire connectors)
- Electrical tape
- Neutral wire
- Hot wire
- Ground wire
Having all these tools and materials on hand will make the installation process smoother and more efficient. If you’re unsure about handling electrical wiring, consider consulting a qualified electrician.
Working with the Electrical Panel
Before beginning any electrical work, it’s crucial to prioritize safety by turning off the power supply at the electrical panel. Locate your home’s electrical panel, open it, and switch off the appropriate breaker to disconnect power from the circuit you’ll be working on. Always use a non-contact voltage tester to confirm that the power is completely off before proceeding with the installation of your motion sensor light switch. The electrical panel serves as the central hub for your home’s electrical system, housing breaker switches and providing access to wiring diagrams that can guide your installation. Carefully follow all instructions, and if you’re ever uncertain about any part of the process, consult a qualified electrician. Taking these precautions ensures that your installation of a motion sensor light switch is both safe and successful.
Choosing the Right Motion Sensor Light Switch
Selecting the Right Motion Sensor Light Switch
When choosing a motion sensor light switch, consider the following factors:
- Compatibility: Ensure the switch is compatible with your existing light fixture and electrical system.
- Range: Choose a switch with a detection range that suits your specific needs. This will ensure the motion sensor lights work effectively in your desired area.
- Sensitivity: Select a switch with adjustable sensitivity to prevent false triggers from small animals or other non-threatening movements.
- Energy Efficiency: Opt for a switch with energy-efficient features, such as automatic shut-off and low power consumption. This will help in reducing energy costs and increasing the lifespan of your light fixture.
- Durability: Choose a switch with a durable design and high-quality materials to withstand various environmental conditions, especially if installing an outdoor motion sensor light.
By considering these factors, you can select the right motion sensor light switch for your specific needs and ensure a successful installation.
Removing the Existing Light Switch
To begin installing your new motion sensor light switch, you’ll first need to remove the existing light switch. Start by ensuring the power is off at the electrical panel to prevent any risk of electric shock. Next, unscrew and remove the light switch cover plate from the wall. Gently pull the existing switch and attached wires out of the wall hole, taking care not to damage any of the wires. You may see two black wires, a green wire, and a bare wire connected to the old switch these will need to be identified and properly connected to your new motion sensor switch. If needed, use electrical tape to label each wire for easy identification during installation. When disconnecting the wires, use a wire nut to cap any exposed ends and keep all connections secure. This careful preparation ensures a smooth transition to your new sensor light switch and helps maintain a safe working environment.
Understanding Wire Colors
Properly identifying and connecting all the wires is a key step when installing a motion sensor light switch. Typically, the black wire is the hot wire that carries live electrical current, while the white wire serves as the neutral wire. The green wire and any bare copper wire are used for grounding, providing an essential safety feature. In some setups, a red wire may be present, which usually connects to the load, or the light fixture itself. When wiring your new motion sensor switch, always match each wire to its corresponding terminal as indicated in the wiring diagram. Double-check every connection for firmness and accuracy before restoring power. Since wire colors and configurations can vary, especially in older switch boxes or unique installations, don’t hesitate to consult a qualified electrician if you’re unsure. Ensuring correct connections for the ground wire, hot wire, neutral wire, and load wire is vital for both safety and the proper functioning of your sensor light switch.
Installation Guidelines
When installing a motion sensor, there are guidelines to which you and your electrician should adhere:
- The motion sensor should be installed by a qualified electrician.
- Ensure the power supply is switched off prior to installation or servicing.
- The sensor should not be modified. This will void any warranty.
- The sensor should be connected to a stable power supply.
Step-by-Step Guide to Wiring a Motion Sensor Light Switch:
- Turn off the power at the main fuse box.
- Using a voltage and circuit tester, test each wire to ensure the power is off. If you are replacing an old switch, remove the two screws holding the old switch in place before proceeding.
- Attach the motion sensor’s mounting strap to allow you to attach each wire before fully mounting your fixture. Make sure your motion switch is compatible with your wiring setup.
- Pair the black supply wire with the black fixture wire. If your motion switch has a blue wire, connect it according to the manufacturer's instructions. If the blue wire is not connected properly, the switch may not function as expected.
- Pair the white supply wire with the white fixture wire.
- Pair the ground supply wire with the ground fixture wire. Connect the ground wire to the existing ground wire in the box, and use a green sleeve to identify or connect ground wires. If your switch box is a metal box or uses metal conduit, you can also ground the device by attaching the ground wire to the metal box or conduit.
- Connect each wire using connectors and electrical tape. If you have two wires (such as two black wires), connect them together, and if there is another black wire, refer to the wiring diagram to ensure proper connection. Use a yellow nut cap to secure multiple wires together. If installing a Lutron occupancy sensor, connect the silver and green wires together and secure with a nut cap. Ensure the connection is secure at the other end of the wire.
- If wiring colors do not match, use a voltage meter to identify positive, negative, and ground wires. If your motion sensor shares a switch box with another switch, double-check the wiring configuration.
- Ensure connections are secure by tightening each screw and checking the screws holding the wires in place.
- Attach your fixture to the mounting strip using the screws provided.
- Finish installing your fixture by mounting it appropriately to the wall or switch box with the screws provided.
- Turn on the power.
- Test your light.
Motion lights will activate when they detect motion, helping to deter intruders and provide illumination when needed, while also saving on energy costs due to their automatic functionality.
Testing and Verification
Once your motion sensor light switch is installed, it’s important to test and verify that everything is working as intended. Restore power at the electrical panel and observe whether the sensor detects motion and activates the light switch accordingly. Take time to fine tune the sensor’s sensitivity and timing settings to achieve optimal performance for your space. Use a voltage tester to confirm there are no electrical faults or hazards present. This testing phase is a critical part of the installation process, ensuring your sensor light switch delivers the convenience, security, and energy efficiency you expect. If the motion sensor light does not operate correctly, double check all wiring connections and consult a qualified electrician if needed. Regularly testing and adjusting your motion sensor switch will help maintain its effectiveness and keep your energy usage in check.
.
Motion Sensor Wiring Schemes
Motion sensors have a number of detection methods used to provide illuminated coverage of a specific area. There are a number of functions that can be installed on a motion sensor to ensure complete accuracy and avoid false motion detections. For wiring diagrams on these functions, continue reading.
On/Off Function
Motion sensors have the ability to switch on a light when movement is detected and switch off after a set period of time when no motion is detected. To install this feature:
- Connect your motion sensor to normal control gears (LED drivers or ballasts):
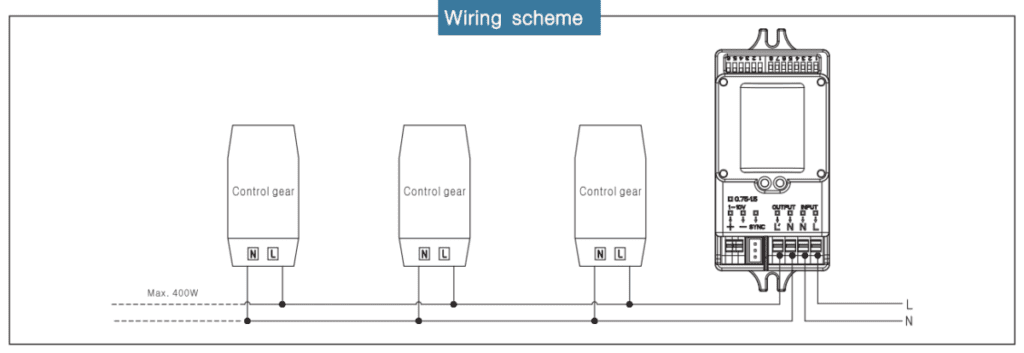
Click to view larger image

3-Step Dimming Function
Once motion is detected by any of the sensors, a signal will be transmitted to the remaining sensors so all lamps switch on at the same time. When no motion is detected in the area, all lamps will synchronously dim to a low light level after the hold time. To connect to 1–10v dimmable control gears, use the following wiring scheme:
- To connect to 1–10v dimmable control gears, the wiring as follows:
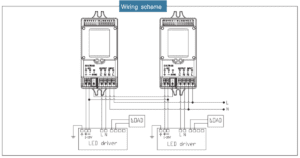
Click to view larger image

Daylight Harvesting Controls for Energy Efficiency
Use this feature for lighting systems that should either dim or completely turn off when daylight is available. The daylight sensor level of the motion sensor should be set to disable mode if connected to the daylight sensors:

Click to view larger image
Daylight Sensor:
The sensor can be set to allow the lamp to illuminate within a defined ambient-light-level threshold. The settings are:
- I: 2 lux - darkness operation only
- II: 5 lux - darkness operation only
- III: 10 lux - twilight operation
- IV: 25 lux - twilight operation
- V: 50 lux - twilight operation
- VI: 100 lux - twilight operation
- VII: Disable
When set to disable, the daylight sensor will switch on the lamp when motion is detected, regardless of ambient light levels.
Motion Sensor Settings
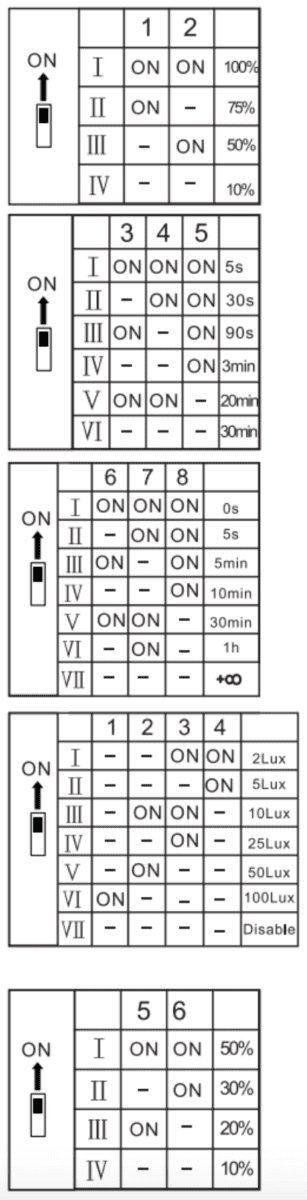
Click to view larger image
Each sensor has the ability to customize detection area, hold time, and standby periods by using DIP switches. It is important to note that, when reducing the detection area, the sensitivity of the sensors will also be reduced.
Detection Area
The detection area of your motion sensor can easily be reduced by selecting the appropriate combination on the DIP switches.
Hold Time
A motion sensor’s hold time refers to the period of time the lamp remains 100% illuminated after no motion is detected.
Stand-by Period
A motion sensor’s stand-by period refers to the period of time the lamp remains at a low light before it completely switches off.
Daylight Sensor
A motion sensor can be set to ensure a lamp is only illuminated below a predefined brightness threshold.
For an in-depth look at each wiring scheme, click here.
Conclusion
Installing a motion sensor light switch is a smart and efficient way to enhance convenience, improve security, and reduce energy consumption in your home or business. By carefully following the step-by-step guide and wiring instructions, you can successfully replace your existing switch with a new motion sensor switch that automatically controls your lighting based on movement. Always prioritize safety by turning off power at the electrical panel before starting any electrical work and double-check all wire connections, including the ground wire, neutral wire, and hot wire. If you encounter any uncertainties during the installation process, consulting a qualified electrician is highly recommended. With proper installation and fine-tuning of settings such as sensitivity and timer, your motion sensor light switch will provide reliable, hands-free lighting control that saves energy and adds peace of mind.
Speak to an Access Fixtures Lighting Specialist
Access Fixtures is your factory-direct source for all light fixtures needed to illuminate your property suitably. If you have a lighting question, we will be glad to answer it. We want to make sure you get the exact fixture for your needs, your budget, and your goals. We are passionate about lighting and love what we do—we’ll get you an answer. To speak with an Access Fixtures lighting specialist, call (800) 468-9925.
How to Install a Motion Sensor Light Switch Frequently Asked Questions (FAQs)
What is a motion sensor light switch?
A motion sensor light switch is a device that automatically turns lights on when motion is detected and off after a set period of inactivity, helping to save energy and increase convenience.
Do I need a neutral wire to install a motion sensor switch?
Most modern motion sensor switches require a neutral wire for proper operation. However, some models are designed to work without a neutral wire. Always check the product specifications and your existing wiring before purchasing.
Can I install a motion sensor light switch myself?
Yes, if you have basic electrical knowledge and follow safety precautions, you can install a motion sensor light switch yourself. Always turn off power at the breaker and follow the instructions carefully. If unsure, consult a qualified electrician.
What tools are needed to install a motion sensor light switch?
Common tools include a voltage tester, wire cutters or pliers, a terminal screwdriver, electrical tape, and wire nuts. Having these tools ready will make the installation process smoother.
How do I identify the wires in my switch box?
Typically, black wires are hot wires, white wires are neutral, green or bare copper wires are ground wires, and red wires are often load wires connected to the light fixture. Always double-check with a voltage tester.
What should I do if my switch box has no ground wire?
If there is no ground wire, you may be able to ground the motion sensor switch to the metal box if it is grounded. Otherwise, consult a qualified electrician for safe installation options.
How do I adjust the sensitivity and timer settings on my motion sensor switch?
Most motion sensor switches have adjustable settings using DIP switches or dials. These allow you to fine-tune detection range, sensitivity, hold time, and standby periods. Refer to your switch’s manual for specific instructions.
Will motion sensor switches work with LED lights?
Yes, many motion sensor switches are compatible with LED lights. Ensure you choose a switch rated for LED loads to avoid flickering or malfunction.
Can motion sensor light switches help reduce electricity bills?
Yes, by automatically turning off lights when no motion is detected, these switches reduce unnecessary energy usage, which can lead to noticeable savings on electricity bills.
What should I do if the motion sensor light switch does not work after installation?
First, double-check all wiring connections, including ground, neutral, and hot wires. Verify the power is on at the breaker. If issues persist, consult the switch’s troubleshooting guide or contact a qualified electrician.